
ISO in photography is the camera setting beginners often raise only when a picture looks too dark. That works sometimes, but it misses the more useful idea: ISO helps you achieve the shutter speed and aperture the photograph actually needs when the available light is limited.
A low ISO usually gives cleaner files and greater editing flexibility. A higher ISO can introduce more visible noise and reduce image quality, but it can also make the difference between a sharp photograph and one ruined by unwanted motion blur.
This guide explains what ISO does, when to raise it, how Auto ISO can simplify shooting, and how to choose practical settings for portraits, landscapes, sports and low-light photography.
What Is ISO in Photography?
ISO is a camera setting that changes how bright the recorded image appears for a given aperture and shutter speed. On digital cameras, increasing ISO does not physically make the sensor collect more light. The amount of light captured is determined by the scene, aperture and exposure time; ISO changes the camera’s signal processing and the resulting image brightness.
That distinction is useful because it prevents a common beginner mistake: treating ISO as a substitute for light. If you can safely use a wider aperture, slower shutter speed, brighter environment or added light, those choices can increase the amount of light actually captured. When those options would compromise the photograph, raising ISO becomes practical.
For a manufacturer overview, see Nikon’s guide to understanding ISO sensitivity.
How ISO Affects Noise and Image Quality
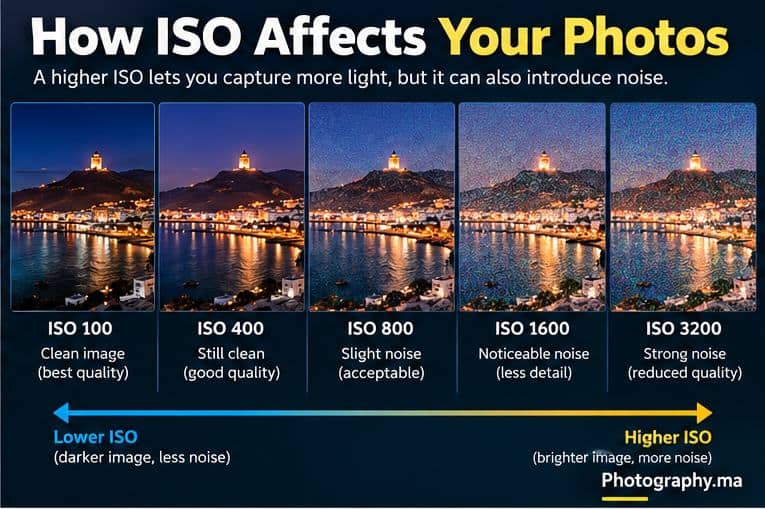
As ISO rises, noise generally becomes more visible and the file usually retains less tonal and color information than a comparable image made with more light at a lower ISO. The exact result varies greatly by camera, exposure, processing and viewing size.
This does not mean high ISO is automatically bad. A sharp ISO 3200 photograph of a moving subject can be far more useful than a cleaner ISO 100 photograph blurred by a shutter speed that was too slow.
Noise is also easier to notice in dark areas and in files that are strongly brightened during editing. Getting an appropriate exposure in-camera can therefore matter more than obsessing over the lowest possible ISO.
Low ISO vs High ISO
| ISO range | Typical use | Main advantage | Main compromise |
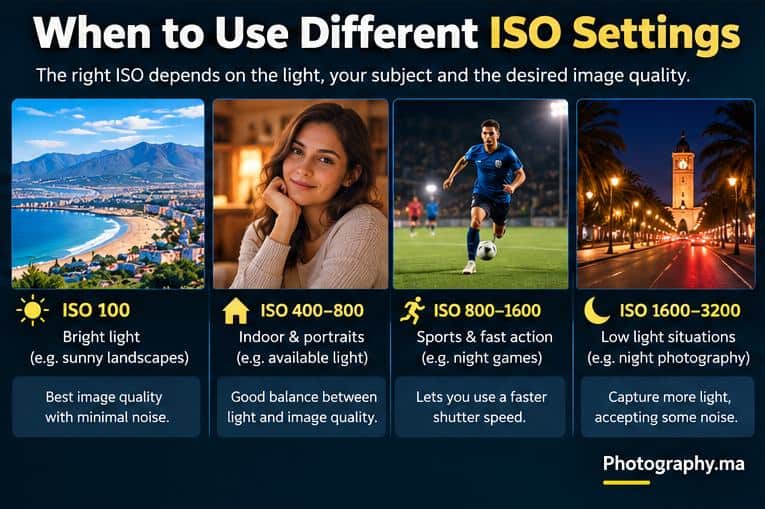
| ISO 100–200 | Bright daylight, tripod landscapes | Clean files and strong image quality | May require slower shutter speeds |
| ISO 400–800 | Indoor light, overcast scenes, portraits | More flexibility for shutter speed | Some cameras begin showing more noise |
| ISO 800–1600 | Action in weaker light, events | Helps maintain faster shutter speeds | More visible noise / less editing latitude |
| ISO 1600–3200+ | Night, indoor sports, very low light | Can make otherwise difficult shots possible | Noise and reduced detail become more noticeable |
These are examples, not quality limits. Modern cameras differ substantially, and a properly exposed high-ISO file can look excellent at normal viewing sizes.
When Should You Raise ISO?
Raise ISO when aperture and shutter speed already reflect what the photograph needs, but the exposure would otherwise be too dark.
- You need a faster shutter speed to freeze a runner, animal, child or vehicle.
- You are handholding in low light and your current shutter speed causes camera shake.
- Your lens is already at the widest aperture you are comfortable using.
- You need enough depth of field that opening the aperture further would make important areas soft.
- The light changes quickly and Auto ISO can maintain a safe shutter speed.
The key question is not “How low can I keep ISO?” It is “What ISO lets me make the photograph with the shutter speed and aperture I need?”
ISO for Portrait Photography
In good daylight, ISO 100 or 200 is often a sensible starting point. Indoors or near a window, ISO 400–800 may be more practical, and darker environments can require substantially more.
Prioritize a shutter speed that prevents subject movement and camera shake. A perfectly clean file is not valuable if the eyes are blurred because the shutter speed dropped too far.
For depth-of-field choices, see Aperture in Photography.
ISO for Sports and Wildlife
Sports and wildlife frequently require fast shutter speeds, which reduce exposure time. If the aperture cannot provide enough light, ISO must rise.
A practical approach is to choose the shutter speed needed to control motion, select an aperture that provides sufficient light and depth of field, then let ISO fill the remaining exposure requirement. Auto ISO is particularly useful when the subject moves between sun and shade.
For choosing motion-freezing speeds, continue with Shutter Speed in Photography.
ISO for Landscape Photography
For a static landscape on a tripod, a low ISO is usually desirable because you can often lengthen the exposure instead of raising ISO. But ISO 100 should not become a rigid rule.
Wind-blown foliage, waves, handheld shooting or changing light may require a faster shutter speed. In those situations, increasing ISO can preserve the movement or sharpness you actually want.
The practical field workflow is covered in Landscape Photography Tips for Beginners.
ISO for Low-Light and Night Photography
At night, first decide whether the camera and subject can remain still. With a tripod and a static scene, a longer exposure can often keep ISO relatively low. With moving people, handheld street photography or action, a longer exposure may create unacceptable blur, so a higher ISO becomes necessary.
Do not judge high-ISO quality only at 100% magnification. Consider how the photograph will actually be used: a web image, social post and large print do not impose the same demands.
Auto ISO: One of the Most Useful Beginner Tools
Auto ISO lets the camera adjust ISO automatically as light changes. Used well, it can reduce the number of settings you need to manage while still protecting the shutter speed or aperture that matters most.
Many cameras allow you to set a maximum ISO and, in some modes, a minimum shutter speed. The exact controls differ by brand and model, so check your camera manual.
A useful everyday strategy is Aperture Priority plus Auto ISO when depth of field matters most. For action, Manual exposure with Auto ISO can be powerful on cameras that support it: you choose aperture and shutter speed, while ISO adapts to changing light.
ISO, Aperture and Shutter Speed Work Together
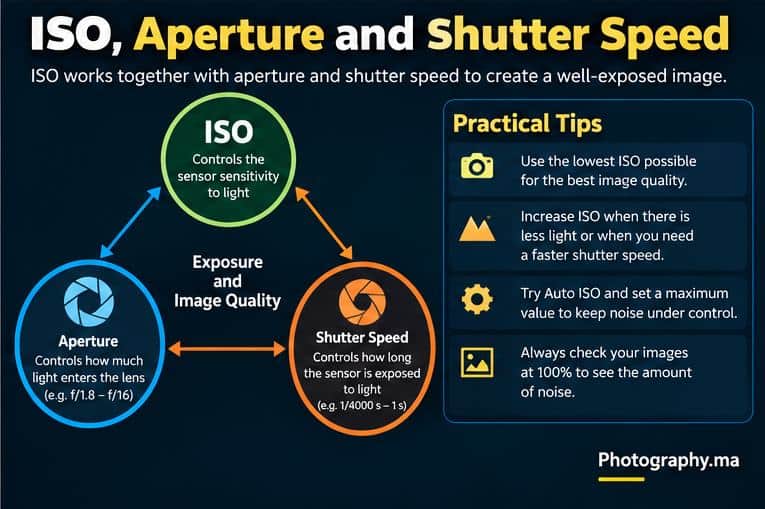
Aperture, shutter speed and ISO influence the final brightness together, but they do not have identical photographic consequences. Aperture changes depth of field and the amount of light entering through the lens. Shutter speed changes exposure time and the rendering of motion. ISO changes image brightness and affects noise and available image quality.
Suppose you are photographing a runner at dusk. You may need 1/1000 second to freeze motion and f/2.8 because the light is weak. If the resulting image is still too dark, raising ISO is often the correct next move rather than lowering the shutter speed and accepting motion blur.
For the complete foundation, read ISO, Aperture, and Shutter Speed Explained.
Does Higher ISO Always Mean More Noise?
In practical photography, higher ISO is commonly associated with more visible noise, but the comparison is meaningful only when the shooting conditions are considered. If two images are made with different amounts of captured light, their noise differences are not caused by the ISO number alone.
For beginners, the useful rule remains simple: capture as much light as the photograph safely allows, then use the ISO needed to reach the desired brightness without sacrificing essential shutter speed or aperture.
What Is the Best ISO?
There is no universal best ISO. The best value is usually the lowest ISO that still allows the aperture and shutter speed required for the photograph.
In bright daylight that might be ISO 100. Indoors it might be ISO 800. At a night sports event it might be ISO 3200 or higher. The correct choice depends on the camera, light, subject and intended output.
Common ISO Mistakes
- Refusing to raise ISO and accepting motion blur instead.
- Using very high ISO in bright light when a lower value would work just as well.
- Thinking ISO physically adds more light to the sensor.
- Opening the aperture too far merely to keep ISO low, then losing needed depth of field.
- Judging every photograph at 100% magnification instead of considering its real viewing size.
- Leaving Auto ISO unrestricted without checking the maximum value or minimum shutter-speed behavior on your camera.
A Simple ISO Decision Workflow
- Decide whether motion must be frozen or intentionally blurred.
- Choose the shutter speed that produces that result.
- Choose the aperture required for depth of field and available lens performance.
- Check the exposure.
- If the image is too dark and you cannot safely slow the shutter or open the aperture, raise ISO.
- Take a test photograph and inspect important detail, motion and noise.
- Adjust according to the photograph—not according to a rule that ISO must always remain at 100.
10-Minute ISO Exercise
- Photograph the same scene at ISO 100, 400, 800, 1600 and 3200 while keeping overall brightness comparable by adjusting another exposure setting.
- Compare the files at normal viewing size first, then zoom in.
- Look at smooth dark areas, fine textures and color detail.
- Repeat the test in bright light and in a darker room.
- Identify the highest ISO you personally consider acceptable for web use and for larger output.
- Repeat with a moving subject and notice when raising ISO allows a shutter speed that produces a sharper photograph.
FAQ
What ISO should a beginner use?
Start with a low ISO such as 100 or 200 in bright light, but raise it whenever you need a faster shutter speed, more depth of field or reliable handheld results.
Is ISO 800 too high?
Not necessarily. ISO 800 is routine on many modern cameras. Whether the result is acceptable depends on the camera, exposure, processing and intended viewing size.
Should I always use ISO 100 for the best quality?
No. ISO 100 is useful when the light and required settings allow it. If it forces an unwanted slow shutter speed or unsuitable aperture, a higher ISO can produce the better photograph.
Is Auto ISO good for beginners?
Yes. Auto ISO can be extremely useful, especially when light changes. Learn how your camera handles maximum ISO and minimum shutter speed so the automation supports your priorities.
Does ISO change exposure?
Changing ISO changes the brightness of the recorded image for a given aperture and shutter speed, but it does not increase the physical amount of light captured by the sensor.
Final Takeaway
ISO in photography is not a setting to fear. Low ISO is valuable when the scene gives you enough light, but higher ISO is a practical tool when motion, depth of field or handheld stability matters more.
Choose shutter speed and aperture according to the photograph you want, then use the ISO necessary to make those choices work. A little noise is usually easier to accept—or reduce in processing—than a photograph ruined by unwanted blur.
3 thoughts on “ISO in Photography: A Beginner’s Guide to Noise and Image Quality”
Comments are closed.