

Your camera can focus perfectly and still produce an exposure that looks wrong. A bright window may turn a face into a silhouette. A dark stage may fool the camera into making a performer too bright. Snow, black clothing, sunsets and spotlights can all push automatic exposure away from the result you intended.
That is where metering modes become useful. Metering is the camera’s way of measuring scene brightness before it chooses—or recommends—an exposure. The mode you select changes which parts of the frame receive the most attention.
For most beginners, the practical choice is simple: start with Matrix or Evaluative metering for everyday photography, move to Center-Weighted when the central subject matters more than the surroundings, and use Spot metering when you deliberately want to measure a small, specific area.
This guide treats those as starting points rather than rigid rules. Camera brands use different names and implementations, so the exact behavior can vary by model.
What Does a Camera Meter Actually Measure?
A camera meter measures reflected light coming from the scene. It does not know that a wall is supposed to be white, a jacket is supposed to be black, or a face is the most important part of the photograph. It evaluates brightness and helps the exposure system decide how much light should reach the final image.
In Program, Aperture Priority and Shutter Priority modes, metering can directly influence the exposure the camera chooses. In Manual mode, the meter usually acts as a guide: you decide the aperture, shutter speed and ISO while watching the exposure indicator, histogram or live preview.
This is why metering is related to exposure but is not the same thing as the exposure triangle. If aperture, shutter speed and ISO still feel unfamiliar, read Photography.ma’s ISO, Aperture, and Shutter Speed Explained guide first.
The Three Metering Modes Beginners Should Learn
The names differ slightly across brands. Nikon commonly uses Matrix, Canon commonly uses Evaluative, and Sony commonly uses Multi or multi-segment terminology. All are broad-frame approaches, but their exact algorithms are proprietary and model-dependent. Center-Weighted and Spot are more literal: one emphasizes the center; the other measures a much smaller area.
| Mode | What it emphasizes | Good starting use |
| Matrix / Evaluative / Multi | Many areas across the frame | Everyday scenes, landscapes, travel, changing light |
| Center-Weighted | Whole frame with extra emphasis near the center | Portraits or central subjects with distracting surroundings |
| Spot | A small selected area | Backlight, stage lighting, silhouettes, precise tonal control |
Matrix / Evaluative Metering: The Best Default for Most Situations
Matrix or Evaluative metering divides the scene into multiple areas and evaluates brightness across the frame. Modern cameras may also use additional scene information when deciding on exposure. Nikon describes Matrix as measuring multiple areas, while Canon describes Evaluative as dividing the image into zones and considering lighting conditions such as backlight. For a manufacturer reference, see Nikon’s official metering specifications, which lists Matrix, Center-Weighted, Spot and Highlight-Weighted metering on a current Nikon mirrorless model.
For a beginner, this is usually the most dependable default because it asks the camera to consider the scene as a whole. Use it for street photography, family photos, landscapes, travel, architecture and other situations where you do not need to isolate one tiny tonal area.
Matrix metering is not magic. A very bright sky can still pull exposure down, while a frame dominated by darkness can push exposure up. When the result is consistently too bright or too dark, exposure compensation is often faster than changing metering mode. Learning how these metering modes react to difficult brightness is more useful than changing modes after every imperfect frame.
A practical Matrix-metering workflow
- Select Matrix, Evaluative or Multi metering.
- Choose Aperture Priority for depth-of-field control, or another exposure mode that fits the subject.
- Frame the photograph and take a test shot.
- Check the important subject, highlights and histogram rather than judging only the rear-screen brightness.
- If the result is too dark, add positive exposure compensation. If highlights are being lost, reduce exposure.
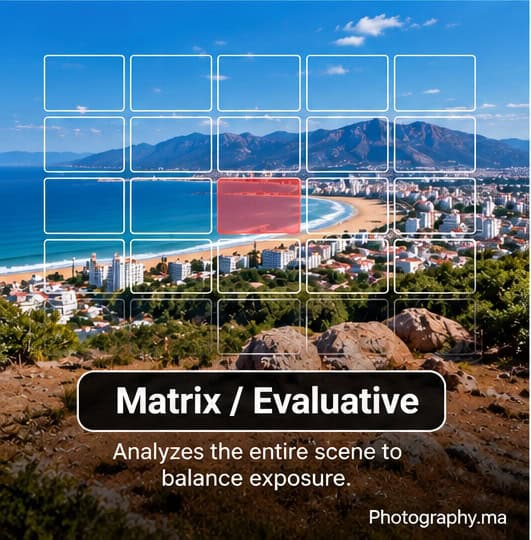
Matrix / Evaluative metering considers brightness across many areas of the frame.
Center-Weighted Metering: Give the Middle of the Frame More Influence
Center-Weighted metering still considers a large part of the frame, but gives more importance to the central area. Nikon documents center-weighted implementations that assign substantial weight to the center, while Canon describes Center-Weighted Average as averaging the frame with greater weight at the center.
This can be useful when your main subject occupies the middle of the composition and the edges contain unusually bright or dark elements. A portrait against a bright environment is a common example, although face detection and modern evaluative systems may already handle many portraits well.
Do not assume Center-Weighted automatically meters a face. It cares about position and brightness, not semantic importance. If the face is off-center, either recompose appropriately, use exposure lock if your camera supports your workflow, or choose a metering method better suited to the composition.
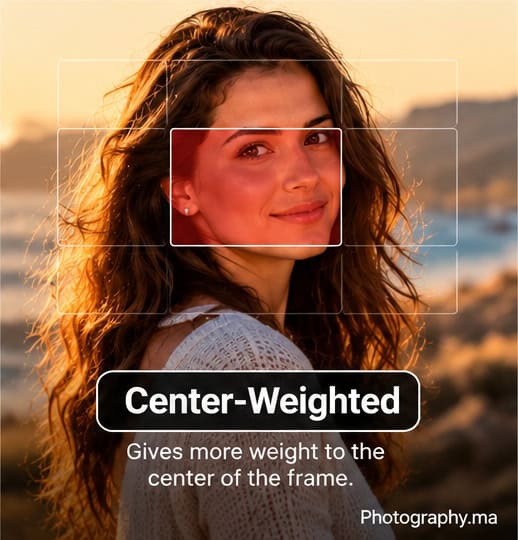
Center-Weighted metering gives the central region more influence than the edges.
Spot Metering: Precision With More Responsibility
Spot metering measures a small part of the frame. On some cameras the spot follows the selected focus point; on others it may be fixed or behave differently depending on settings. Check your camera manual before assuming that focus point and metering spot are linked.
Spot metering is valuable when the subject and background have very different brightness levels. Imagine a person standing in front of a bright sunset, a singer under a spotlight on a dark stage, or a bright moon against a black sky. Measuring a carefully chosen small area gives you more control over which tone drives the exposure.
The tradeoff is sensitivity. If the spot lands on a white shirt, black jacket or bright reflection, the meter can recommend a very different exposure. Spot metering works best when you understand what you are measuring and then verify the result.
A simple Spot-metering method
- Decide which part of the scene must retain the exposure you want.
- Place the metering spot on that area according to your camera’s implementation.
- Read or lock the exposure if needed.
- Recompose without accidentally changing the metered value.
- Take the photograph and check highlights, shadows and histogram.
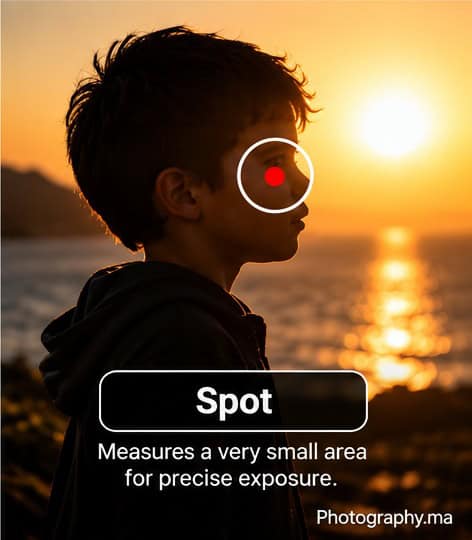
Spot metering isolates a small area, useful when subject and background brightness differ strongly.
Matrix vs Center-Weighted vs Spot: Which Should You Use?
| Situation | Start with | Why |
| General daylight / travel | Matrix / Evaluative | Balances information from across the frame |
| Landscape | Matrix / Evaluative | Usually useful when the whole composition matters |
| Centered portrait | Matrix or Center-Weighted | Either may work; Center-Weighted reduces edge influence |
| Strongly backlit portrait | Matrix + compensation, or Spot | Choose based on whether you want overall balance or precise subject metering |
| Stage performer under spotlight | Spot or highlight-protecting mode if available | The important bright subject may occupy a small part of a dark frame |
| Silhouette | Matrix or Spot with deliberate exposure choice | Metering choice depends on which tone you want to preserve |
| Fast-changing action | Matrix / Evaluative | Less fragile than trying to keep a tiny spot on a moving subject |
Metering Mode vs Exposure Compensation
Beginners often change metering mode when exposure compensation would solve the problem more quickly. These controls do different jobs. Metering mode decides how the camera evaluates brightness; exposure compensation tells an automatic exposure mode to make the result brighter or darker than its current recommendation. In practice, understanding metering modes and exposure compensation together gives you faster control than treating either setting in isolation.
If Matrix metering gives you a portrait that is consistently one step too dark because of a bright background, you can often keep Matrix and add positive compensation. That is usually faster than rebuilding your entire metering workflow.
A useful habit is to keep one reliable default—usually Matrix/Evaluative—and learn exposure compensation well. Change metering mode when you have a specific reason to change what part of the scene drives the measurement.
Metering Mode vs Autofocus Area
Metering and autofocus answer different questions. Autofocus asks where the camera should focus and whether it should keep refocusing. Metering asks how scene brightness should influence exposure.
Some cameras can link Spot metering to an active focus point, which makes the two systems look connected. But that behavior is not universal. Photography.ma’s Autofocus Modes Explained guide should remain the depth guide for AF-S, AF-C, focus areas and tracking; this article owns exposure metering.
Why the Meter Can Be Fooled
Reflected-light meters react to the light coming back from the scene. Very bright or very dark subjects can therefore produce recommendations that do not match your creative intent.
A snow scene can encourage the camera to reduce exposure and make clean white snow look gray. A frame dominated by black clothing or a dark interior can encourage the camera to increase exposure. Strong backlight can leave a face too dark if the camera protects the brighter environment.
The solution is not to distrust the meter. Treat its reading as a starting point, then compare it with the scene, the histogram, highlight warnings and the result you actually want. For a broader troubleshooting workflow, see How to Take Sharp Photos.
Practical Starting Settings for Common Scenes
| Scene | Exposure mode | Metering start | Adjustment to watch |
| Outdoor portrait | Aperture Priority | Matrix / Evaluative | Use compensation if the face is too dark or bright |
| Backlit portrait | Aperture Priority | Matrix or Spot | Decide whether face or background has priority |
| Landscape | Aperture Priority | Matrix / Evaluative | Protect important highlights; check histogram |
| Street photography | Aperture Priority / Manual + Auto ISO | Matrix / Evaluative | Prioritize speed and consistency |
| Concert / stage | Manual or Aperture Priority | Spot or highlight-aware mode | Watch bright skin, costumes and spotlights |
| Product on plain background | Manual or Aperture Priority | Center-Weighted / Spot as needed | Meter the product, then verify with histogram |
What About Highlight-Weighted Metering?
Some newer cameras offer additional modes beyond the basic three. Nikon, for example, offers Highlight-Weighted metering on selected cameras to prioritize bright areas and reduce blown highlights in situations such as stage lighting. Some Sony models also provide additional metering options beyond Multi, Center and Spot.
Treat these as camera-specific tools, not universal replacements for the three core modes. Learn your default broad-frame mode, Center-Weighted and Spot first; then explore special modes when your camera offers them and the scene benefits from them.
Five Common Metering Mistakes
- Changing metering mode after every imperfect exposure. First ask whether exposure compensation is the simpler fix.
- Assuming Spot metering means “meter the subject.” It meters a small area; choosing the right area is your job.
- Confusing autofocus with metering. A focus point does not automatically define the metering area on every camera.
- Trusting the LCD brightness alone. Screen brightness can mislead you; use the histogram and highlight warnings when available.
- Memorizing one mode for one genre. Light and tonal contrast matter more than labels such as portrait or landscape.
A 10-Minute Metering Exercise
Choose a stationary subject near a bright window or outdoors with a noticeably brighter background. Keep composition, aperture, ISO and focal length as consistent as possible.
Photograph the same scene with Matrix/Evaluative, Center-Weighted and Spot metering in an automatic exposure mode. For Spot, deliberately meter a bright area, then a darker area. Compare shutter speed, histogram, highlight detail and subject brightness.
The goal is not to prove that one mode is best. It is to see how changing the measured area changes the camera’s exposure decision. Repeat the exercise with a dark subject against a bright background and the behavior becomes much easier to predict.
Quick Decision Guide
- If you are unsure: use Matrix / Evaluative / Multi.
- If the central subject should dominate the reading: try Center-Weighted.
- If one small area must drive exposure: use Spot carefully.
- If the whole image is simply too bright or dark: try exposure compensation before changing modes.
- If the light is extreme: verify with the histogram and protect important highlights.
- If your camera offers highlight-weighted or other special modes: learn them after the core three.
Frequently Asked Questions
Is Matrix metering the same as Evaluative metering?
They serve a similar broad-frame purpose, but they are brand-specific systems rather than identical algorithms. Nikon commonly calls its system Matrix, Canon uses Evaluative, and Sony often uses Multi or multi-segment terminology.
Should beginners use Spot metering?
Yes, but only when there is a clear reason. Spot metering is excellent for learning how tonal choices affect exposure, but it is less forgiving than a broad-frame mode when subjects move or light changes quickly.
Does Spot metering follow the autofocus point?
Sometimes, depending on the camera and settings. Nikon documents models where Spot metering can be centered on the selected focus point, while other cameras may behave differently. Check the manual for your exact model.
Does metering matter in Manual mode?
Yes, but differently. In Manual mode you normally choose the exposure settings yourself while the meter provides a brightness reference. With Auto ISO enabled, some cameras can still automatically change ISO according to metering and compensation settings.
What metering mode should I leave my camera on?
For most beginners, Matrix/Evaluative/Multi is the most practical default. Learn exposure compensation next, then use Center-Weighted or Spot when the scene gives you a specific reason.
Final Takeaway
Metering becomes easier when you stop treating the modes as competing technologies. Matrix/Evaluative is the flexible default, Center-Weighted gives the middle of the frame more influence, and Spot lets you deliberately measure a small area. Once these metering modes feel predictable, exposure decisions become much faster in changing light.Start broad, check the result, and become more selective only when the scene demands it. Combined with exposure compensation, the histogram and a clear idea of which tones matter, metering modes become practical tools rather than another camera menu to memorize.