Best Photography Tips for Beginners (20 Practical Tips – Complete Guide)
Starting photography can feel overwhelming. There are technical settings to understand, creative rules to apply, and lighting conditions that constantly change. Many beginners think they need expensive gear to take great photos — but that’s not true.
Good photography is built on three pillars:
- Understanding light
- Controlling your camera
- Training your eye
This complete guide walks you through 20 practical tips that will help you build strong foundations and improve faster than most beginners.
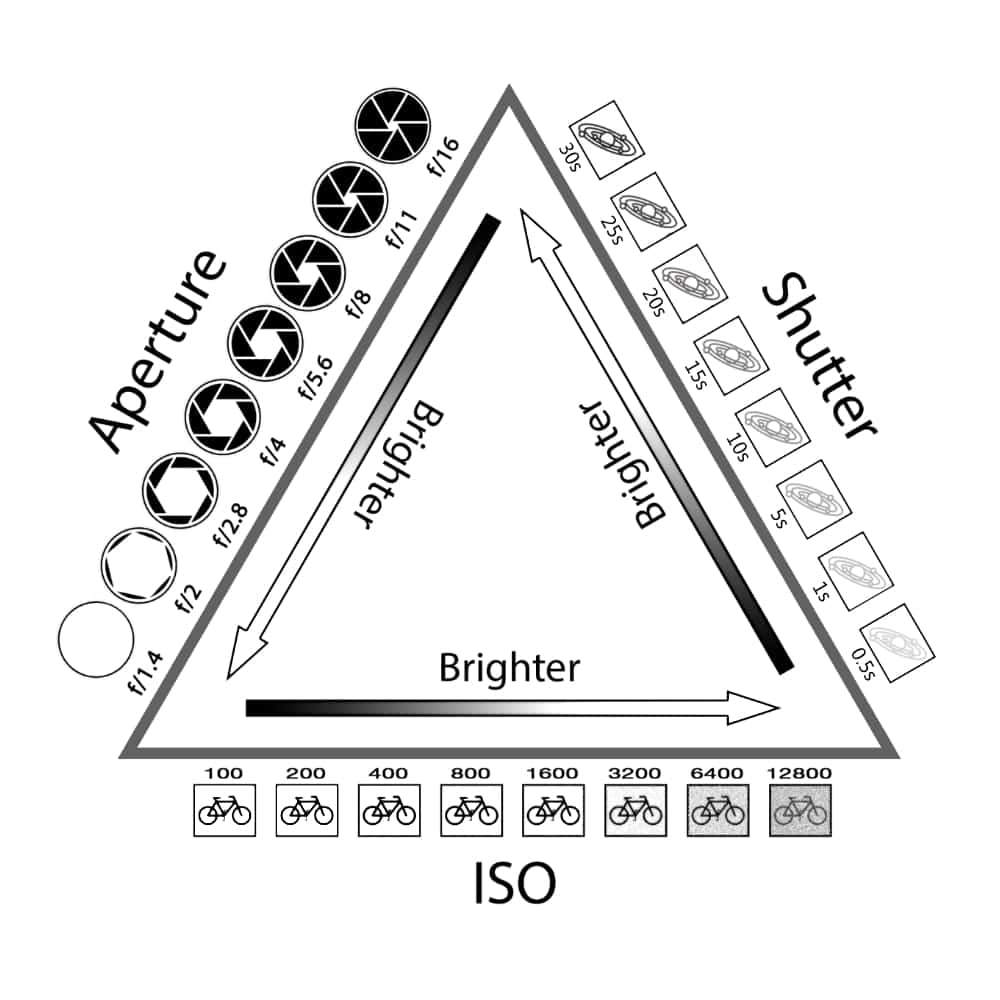
1. Understand the Exposure Triangle
Every photograph depends on three core settings:
- ISO
- Aperture
- Shutter Speed
These three control brightness and image quality. If you increase one, you often need to decrease another. Learning this balance is the first major step toward taking control of your camera.
2. Keep ISO as Low as Possible
ISO controls light sensitivity. Higher ISO makes images brighter, but it also adds digital noise.
Best practice:
- Bright outdoor light → ISO 100
- Cloudy → ISO 200–400
- Indoors → Increase gradually
Use the lowest ISO possible for cleaner images.
3. Learn How Aperture Affects Depth
Aperture controls how much of your image is in focus.
- f/1.8–f/2.8 → Blurry background (great for portraits)
- f/5.6 → Balanced focus
- f/8–f/11 → Everything sharp (ideal for landscapes)
Aperture is one of the most creative settings on your camera.
4. Choose the Right Shutter Speed
Shutter speed controls motion.
- 1/500+ → Freeze fast action
- 1/250 → Everyday photography
- 1/60 → Still subjects
- Slower → Motion blur
If your subject moves, increase shutter speed.
5. Shoot During Golden Hour
Golden hour happens shortly after sunrise and before sunset. The light is softer, warmer, and more flattering.
This type of light adds depth and dimension to your photos without extra effort.
6. Avoid Harsh Midday Light
Midday sun creates strong shadows and high contrast.
If shooting at noon:
- Move into shade
- Avoid overhead light on faces
- Position your subject facing indirect light
Lighting position matters more than camera settings.
7. Use the Rule of Thirds
Divide your frame into nine equal sections. Place your subject along the grid lines or intersections.
This creates balance and prevents static compositions.
8. Simplify the Background
Before pressing the shutter, check what’s behind your subject.
Avoid:
- Bright distracting objects
- Poles or lines crossing heads
- Busy environments
Cleaner backgrounds instantly improve photos.
9. Focus Precisely
Blurry photos are usually caused by incorrect focus.
For portraits:
- Focus on the eyes
- Use single-point autofocus
Sharp focus is non-negotiable.
10. Fill the Frame
Don’t stand too far away.
Moving closer eliminates distractions and strengthens subject impact.
If something isn’t adding value, remove it from the frame.
11. Stabilize Your Camera
Camera shake causes unwanted blur.
To stabilize:
- Keep elbows tucked in
- Control breathing
- Lean against walls
- Use a tripod when possible
Sharp images feel professional.
12. Shoot in RAW Format
RAW files store more information than JPEG.
Advantages:
- Better highlight recovery
- More editing flexibility
- Improved color control
If available, choose RAW over JPEG.
13. Learn Basic Editing Skills
Editing enhances strong photos.
Adjust lightly:
- Exposure
- Contrast
- White balance
- Slight sharpening
Avoid extreme filters or unnatural colors.
14. Change Your Shooting Angle
Most beginners shoot at eye level.
Try:
- Low angles
- High perspectives
- Side views
New angles add interest without changing equipment.
15. Use Leading Lines
Roads, bridges, fences, and architectural elements guide the viewer’s eye.
Leading lines create depth and direction in your images.
16. Experiment with Negative Space
Negative space means leaving empty areas around your subject.
This technique:
- Emphasizes the subject
- Creates minimalistic style
- Adds emotional impact
Sometimes less is more.
17. Understand White Balance
Incorrect white balance makes photos look too blue or too orange.
Use:
- Daylight mode outdoors
- Cloudy mode for warmth
- Indoor presets when necessary
Natural colors make photos feel realistic.
18. Use Continuous Autofocus for Action
When photographing movement:
- Switch to continuous AF mode
- Increase shutter speed
- Track the subject
This improves sharpness in dynamic scenes.
19. Practice With Intention
Instead of random shooting, structure your learning.
Example plan:
Week 1 → Composition focus
Week 2 → Light awareness
Week 3 → Manual exposure
Week 4 → Editing techniques
Focused practice accelerates improvement.
20. Be Consistent and Patient
Photography improves over time.
Review your work.
Analyze mistakes.
Compare monthly progress.
Consistency beats talent.
Beginner Camera Settings Cheat Sheet
If you’re unsure where to start, use these reliable combinations:
Outdoor Portraits
- ISO 100
- f/2.8
- 1/200 shutter
Landscapes
- ISO 100
- f/8–f/11
- Adjust shutter accordingly
Indoor Without Flash
- ISO 400–800
- f/2.8–f/4
- 1/100 shutter
These settings are beginner-safe and effective.
Common Beginner Mistakes to Avoid
- Relying only on auto mode
- Ignoring background distractions
- Shooting at extremely high ISO
- Over-editing
- Not checking focus before leaving
Avoiding these alone improves results dramatically.
Final Thoughts
Photography is not about expensive gear. It’s about understanding light, mastering exposure, and developing visual awareness.
Start with these 20 practical tips. Practice regularly. Stay curious. Over time, your images will become sharper, more balanced, and more expressive.
The most important step? Keep shooting.